19-38 gal tank sending unit

Austin86250

Full Access Member
Joined
Oct 5, 2021
Posts
862
Reaction score
504
Location
idaho
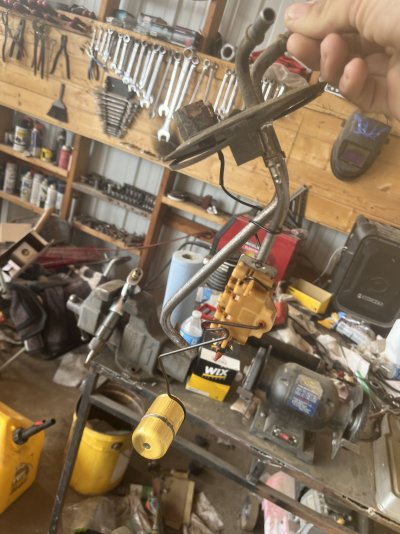
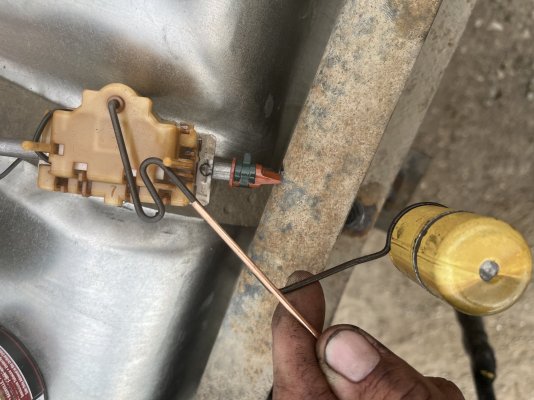
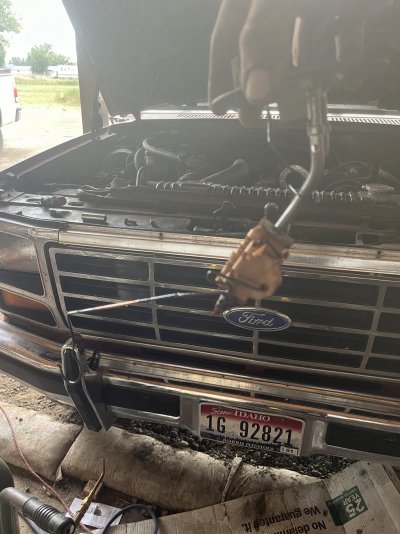
how do you convert the sending unit the actual gauge part for a 38 gallon swap? Didn’t see it via the search bar
I presume just braze a coat hanger to extend it but what length?
Picture would be nice if anyone has some
I also realize that the stock 19 rear the hole for the sending unit is in the front on the top and the sprecta f26e has it on the middle centered on top
 

Reggie f250

Full Access Member
Joined
Oct 18, 2018
Posts
130
Reaction score
101
Location
Bartlett il
The 38 gallon tank I got has the sender hole at the front just like the original. For the sender I removed the original float wire and used a piece of coat hanger shaped like the original but longer and bent it so it would read the full depth of the tank. I don't have any pictures but I have to take the tank back out to replace the sender because of rust so when I do I will try to remember to take pictures of what I did.
 

Austin86250

Full Access Member
Joined
Oct 5, 2021
Posts
862
Reaction score
504
Location
idaho
The 38 gallon tank I got has the sender hole at the front just like the original. For the sender I removed the original float wire and used a piece of coat hanger shaped like the original but longer and bent it so it would read the full depth of the tank. I don't have any pictures but I have to take the tank back out to replace the sender because of rust so when I do I will try to remember to take pictures of what I did
How close do you want the float from the bottom of the tank?
I have no idea why I said the sending unit was in the center I was so tired last night lol
 
Last edited:

Austin86250

Full Access Member
Joined
Oct 5, 2021
Posts
862
Reaction score
504
Location
idaho
Or maybe if I could heat it up and undo that squiggly part that would bring me there?
 

Attachments

  • IMG_5588.jpeg
    IMG_5588.jpeg
    275 KB · Views: 12

WrenchWhore

Full Access Member
Joined
Jun 2, 2022
Posts
200
Reaction score
188
Location
Lake Havasu City
I'm literally about to install my 38 gallon tank as well. As far as where you should place the float arm exactly is up to you. My gauge never read complete empty since it started sucking air due to the fuel sloshing at that point. Another issue is when I fill my tank it reads overfull for probably 8 gallons before it starts to drops to F. This could just be tired old gauges or the needle being pegged all the time with the old sending unit being broken causing the gauge to not read true anymore. I think no matter what I do it's going to read like this when it's full but this new tank i'll have the float off the bottom of the tank about 2 inches since I have a sump now. I want this new setup to read true empty on the gauge without sucking air with some lead time after.

At least that's the plan
 

The_Josh_Bear

Full Access Member
Joined
Jun 1, 2016
Posts
1,982
Reaction score
1,558
Location
Western WA
That's odd, my sending unit has a different contraption for the sending unit. Has a plastic bracket that you can put your own wire into and that's what most of us do, get some TIG SS wire or similar, not coat hanger. Then you can fashion it as long or short as you like. Do it all with it empty(unlike me) and you can adjust it fast and easy without making a mess.

Here's a write up I found:
38 Gallon Bronco tank in IDI

My float arm is attached even differently than in that link, so there's 3 ways to do it evidently... I think if I were you I'd try to use the stock wire as a brace to tightly wrap the new wire around for length. Heating it and lengthening it could certainly work, if careful not to hit the unit with too much heat. It's hard to say from this angle.
 

Austin86250

Full Access Member
Joined
Oct 5, 2021
Posts
862
Reaction score
504
Location
idaho
oxy weld 4.5” of this wire onto it i guess
 

Attachments

  • IMG_5594.jpeg
    IMG_5594.jpeg
    307.8 KB · Views: 11

Austin86250

Full Access Member
Joined
Oct 5, 2021
Posts
862
Reaction score
504
Location
idaho
Really not pretty but I think it will hold
 

Attachments

  • IMG_5597.jpeg
    IMG_5597.jpeg
    334.5 KB · Views: 11

Austin86250

Full Access Member
Joined
Oct 5, 2021
Posts
862
Reaction score
504
Location
idaho
Just remember. No one's going to see it when it's inside the tank.
I learned the way I extended it was the wrong way needed to go more down so I bent it into shape e will be about 2.5” from the bottom so not horrible don’t need to be driving that low anyways
My old front tank e was half so doing better at the end of the day
 

Old Goat

Full Access Member
Joined
Jan 14, 2021
Posts
1,755
Reaction score
1,760
Location
Northern Nevada
I installed my 38 gallon one 5 or more yrs back.
For the suction tube, extended it with a piece of copper tubing, and attached it
with compression fittings.
Put the Shower head on the tube and did my adjustments for length so
The SH sat on the tank bottom.

For the Float, took it to a Hot Rod shop, and the guy gas welded a section of gas
rod.
Think I added 5" to the length.

To get the float arm adjusted, (I had 20 gallons of fuel in 2 gallon containers)
Dumped in 10, figured 1/4 tank, then the other 10 for 1/2 tank and adjusted rod, so Iam close to what it is suppose to be.

Some info and pictures in this thread.


Couldn`t find a picture of it, but seen where the Duck Bill return is, a section of
tubing is added to have the fuel returned away from the suction tube. Lessen
chances of bubbles possibly being sucked in.


Goat
 

Old Goat

Full Access Member
Joined
Jan 14, 2021
Posts
1,755
Reaction score
1,760
Location
Northern Nevada
Will this diagram help?


Goat
 
Last edited:

WrenchWhore

Full Access Member
Joined
Jun 2, 2022
Posts
200
Reaction score
188
Location
Lake Havasu City
@Austin86250 Just curious why not just keep the wiring untouched incase you decide to add the Midship tank back at a later time? Whenever WW3 starts popping off it might be worth it to have a spare tank... just a thought. At 38 gallons in the rear plus 19 for the midship tank that puts you in Titan fuel tank capacity...
 
Top