Can’t win for nothing electrical edition

Austin86250

Full Access Member
Joined
Oct 5, 2021
Posts
864
Reaction score
506
Location
idaho
Not sure how I managed this one
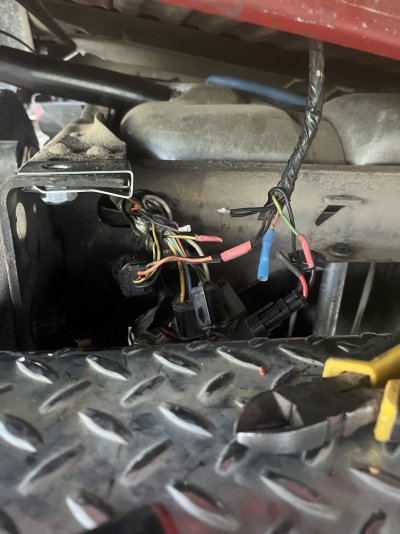
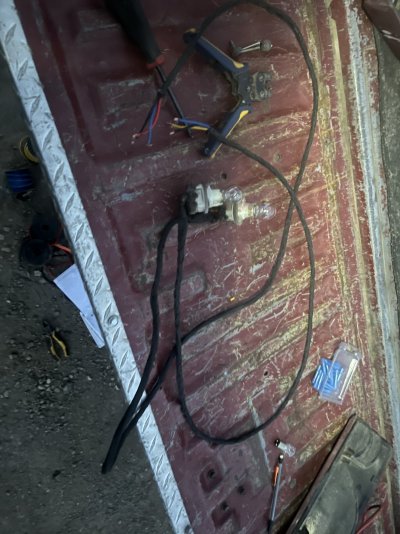
Wires in a fuel pump, looped 2 wires on the fsv connector for the rear tank, and hacked off the front tank wires at the loom
Took the bed off for all this shenanigans

All reassembles I have lost tach, right rear blinker, rear hazards, instrument cluster lights, and brake lights

Left rear blinker, all front lights, and all gauges but tach work

I hit the brakes and one time the reverse lights came on? The reverse light sensor ain’t even hooked up

Fuse #1 (Stop/Hazard Lamps: Speed Control) was blown replaced it didn’t blow again but it didn’t change nothing

All fusable links appear to have continuity

Verified grounds are grounding

Is there a magical wire that I’m somehow missing? I rummaged though my diagrams, under hood wiring, frame rail, and rear connectors. my issues don’t line up digrams and I didn’t find any obvious faults in the wiring

Thanks for reading 86 f-250 for the mobile folk
 

FrozenMerc

Full Access Member
Joined
Dec 21, 2018
Posts
275
Reaction score
488
Location
SW Missouri
Did you pinch a wire when you put the box back on and now have a short that is causing havoc?
 

MIDNIGHT RIDER

Full Access Member
Joined
Sep 29, 2005
Posts
4,702
Reaction score
140
I hate factory wiring for just this reason.

With a factory wired truck, no trailer plugs, no fancy stereo, no extra lights, and not even a phone charger plugged in the lighter; replace a rear tail-light bulb and the horn will start blowing and won't quit.

When I wire a truck, that is the permanent end to all the wiring mysteries and nightmares.

Now some by-the-book jughead will be completely lost and when he gets lost he will start crying "hack job"; but when I flip a switch, it works.

There is very little factory left in the wiring on my truck and it is the only parts that ever cause me problems.

I suggest that, instead of pulling your hair out trying to figure out what Ford had in mind, route your own wires to all those things and your problems will disappear.

AND, don't "borrow power" from this that and the other, but route dedicated wires and circuits to each new addition straight from your HOT junction; a bunch of ring terminals piggy-backed on a battery cable end is not what I consider a HOT junction.
 

franklin2

Full Access Member
Joined
Feb 24, 2009
Posts
5,278
Reaction score
1,531
Location
Va
Electricity. You can't see it. You only can see what it does. How do you troubleshoot something you can't see? You use a testlight or voltmeter.

How do you know which wire to test? You look at the diagrams, and see what color wire does what. Unless the guy who makes his own harness in the previous post, makes his own diagram or memorizes everything, he is lost as to what wire does what.

Only problem I have run into, the old original wiring colors fade and it's hard to tell sometimes what color the wire really is. But this usually only happens around the engine bay heat.
 

RanniWins

Registered User
Joined
Sep 23, 2021
Posts
9
Reaction score
6
Location
Tampa, FL
It sounds like you're dealing with a frustrating electrical issue on your '86 F-250. From your description, it seems like multiple systems are affected, which often points to a common grounding issue or a major harness problem, especially given the symptoms and the recent work you did.

Here’s a practical approach based on firsthand experience with similar vintage trucks:

Recheck All Grounds: Even though you've verified that the grounds are grounding, it's worth doing a thorough check again. Ensure that not only are they grounded, but that they are clean, tight, and making good contact with bare metal. Ground issues can cause bizarre electrical behaviors and are often overlooked.

Harness and Connector Inspection: Since you worked around the fuel pump and tanks, closely inspect the entire run of wiring harnesses and connectors in those areas again. Look for any pinched wires, especially where the bed meets the frame, as suggested by one of the responders. Even a small nick in a wire can cause big issues.

Circuit Testing: Utilize a multimeter to test continuity for the affected circuits. Start from the fuse box to each component, checking for breaks in the wire. This can be time-consuming but is often the only way to track down a hidden issue.

Consider Rewiring Critical Circuits: If all else fails and you find the factory wiring too compromised or altered, it might be worth running new dedicated wires for the critical systems like brake lights and turn signals. This approach, as one commenter suggested, can often eliminate mysterious electrical issues by bypassing aged or damaged factory wiring.

Lastly, remember that electrical problems can sometimes be deceptively simple, so double-check the basics like fuses, connectors, and switches before diving into more invasive diagnostics.
 

Austin86250

Full Access Member
Joined
Oct 5, 2021
Posts
864
Reaction score
506
Location
idaho
I forgot I ran power to the tach off my old facet fuel pump switch since I used it as a primer pump so that makes me feel better since it’s more concentrated to taillights,
Last night I verified by sending power strait to the bed connector the bed parts of the wiring is good
Took the bed bolts out and jacked the bed up (thank god for superduty bed bolts) wiring is pinched
The wiring for the bed etc should run to a connector under the hood correct Before running in the cab?
 

Rdnck84_03

Full Access Member
Joined
Jan 15, 2019
Posts
1,247
Reaction score
1,371
Location
Kansas
Off hand I don't remember there being a connector for the frame harness under the hood on the bullnose trucks.

I know the OBS and superduty there is a series of plugs below the brake master cylinder for the frame harness, but I don't remember seeing any kind of a connector on any of my bullnose trucks.

James
 

MIDNIGHT RIDER

Full Access Member
Joined
Sep 29, 2005
Posts
4,702
Reaction score
140
Recheck All Grounds: Even though you've verified that the grounds are grounding, it's worth doing a thorough check again. Ensure that not only are they grounded, but that they are clean, tight, and making good contact with bare metal. Ground issues can cause bizarre electrical behaviors and are often overlooked.

Good advice and I agree with everything in your post.

When troubleshooting such things, many times I will use a long HOT wire to connect here and there to see if things work; I also clip a long test wire to the battery Ground post and then connect it direct to the Ground connection of the problem component(s) --- BEFORE doing the regular cleaning and tightening of Grounds.

Doing this simple Ground test prior to making any fixes will often pinpoint just where your efforts are needed most.


I believe most electrical problems can be blamed on the age-old practice of depending on chassis-Ground instead of having two wires on everything.

When I wire these big old cattle trailers with a hundred or more markers, I run two wires to every light, HOT and GROUND; I never depend solely on "chassis-Ground"

Twenty years and more after I have wired a trailer, with hundreds of thouwzands of rough miles, constantly being drenched in gallons of cow **** (u r i n e) and worse, every light on her will still burn; not a flicker in the bunch.

Think about it a minute ----- we demand good shiny Copper and Gold-Plated terminal ends and such, firmly crimped and soldered to quality big Copper wire that can be followed through like-minded components straight to a big tooth-washered HOT Junction plate that is getting it's Positive power straight from the HOT Post of the batteries.

Then, we will connect all this shiny, well-connected, pure Copper to a component that is then Grounded by it's mount screw to a Steel Frame or a thin Tin piece of stamped sheet-metal with nary a strand of Copper in sight.

We may as well have used Galvanized Electric Fence Wire to make our Hot connections.
 

franklin2

Full Access Member
Joined
Feb 24, 2009
Posts
5,278
Reaction score
1,531
Location
Va
Ford did run a separate ground wire in a 1986 truck. It is G701 and it terminates behind the radio on the inside firewall. You can see all the grounding for the rear of the truck uses this G701 ground.

You must be registered for see images attach
 

ifrythings

Full Access Member
Joined
Dec 17, 2011
Posts
737
Reaction score
492
Location
BC
Then, we will connect all this shiny, well-connected, pure Copper to a component that is then Grounded by it's mount screw to a Steel Frame or a thin Tin piece of stamped sheet-metal with nary a strand of Copper in sight.

We may as well have used Galvanized Electric Fence Wire to make our Hot connections.
At least the fence wire has some rust protection! I’ve repaired a lot of boat trailer lights and 90%+ the ring terminal attached to the plastic light housing screw has rotted off and everything in the light is rotted away.

Ford did do alright with the chassis harness grounding, they ran a separate ground wire and brought that up to the fenders/rad support, if it was a dully or had factory trailer wiring then there was an extra white ground wire that was ran into the frame at the back and that likes to rot off also.
 

Austin86250

Full Access Member
Joined
Oct 5, 2021
Posts
864
Reaction score
506
Location
idaho
Man I’m about over it with this wiring I’ve burnt up 2 turn signal switches this wiring appears to have a return or something i dont even know
Why is there 4 turn signal wires each?

Does the brake/ hazards ride off the running light or turn signal wire?
 

Attachments

  • IMG_5685.jpeg
    IMG_5685.jpeg
    269 KB · Views: 9
Last edited:

Austin86250

Full Access Member
Joined
Oct 5, 2021
Posts
864
Reaction score
506
Location
idaho
Going with mid night riders method awesome song by the way
Running my own bed wires if there’s still a fault I’ll run news ones all the way to the cab I am DONE with this gobblety **** and I’ll be in control this way

Test run with milwakee battery,
taillights have never been brighter lol
Waiting in a new turn signal switch and I’ll go from there
 

Attachments

  • IMG_5686.jpeg
    IMG_5686.jpeg
    309.9 KB · Views: 7
  • IMG_5687.jpeg
    IMG_5687.jpeg
    264.7 KB · Views: 7
Top