Heim Joint Clutch Pedal Modification
By Ron Butts
Well I
finally got tired of pushing the clutch pedal thru the floorboard to shift, on
my 1989 Ford F-350 Crew Cab and got the much discussed modification done. While
digging around under the dash I found that the firewall had the TSB90167 done
for the structural weakness. The TSB
uses the existing firewall area and installs a strengthener plate to the
firewall for more support. There are a couple of options to this depending on
the extent of damage or weakness to the firewall.
Please
note that this modification is purely a working creation and should only be
used as an alternative to repairing the clutch pedal assembly when the failure
of the nylon bushing has been damaged due to wear and allowed to cause further
damage while going un-repaired.
If the clutch pedal bushing has been neglected and not checked or replaced,
over time, it will cause damage to the dowel pin on the pedal assembly and to
the master cylinder pushrod itself. In my case, it had been neglected by the
previous owner to the point that the pushrod had become egg shaped, and the
dowel pin had worn one third of the way through. With the assembly being that
worn, it was causing great difficulty in shifting from a neutral position to
first or reverse. At this point there are few options to repair the assembly to
obtain proper clutch activation. One must either replace the tab on the pedal
assembly and the master cylinder or use this modification that has been
discussed by several members of the Ford 6.9/7.3 IDI forum at www.oilburners.net. The modification took
about an hour and a half of my time and was not that difficult to complete if
you have the proper tools to do the job.
Preparation
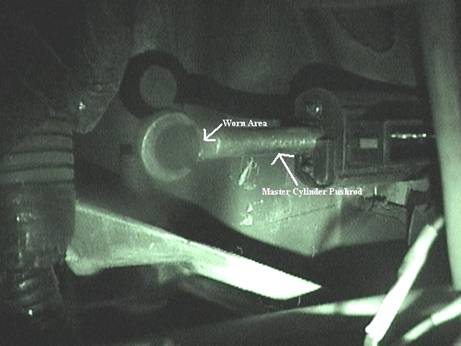
The
photo below was at the start of the project.
One of the ends had already been cut as I had jumped the gun a bit. You
can kind of see the wear without a bushing as the nylon bushing had been
completely disintegrated. Note, the pushrod had been
rotated 90 degrees to better view the damage and the tab on the clutch pedal
had been removed already.
I found it was easier to remove the retainer nut on
the tab on the clutch pedal and remove it to grind the weld off the backside.
To remove the tab, I found that using a short pry bar on the far side of the clutch pedal assembly was the best place to pry from and
allowed the tab to “pop” off. Once the weld was ground off, one swift tap
removed the press fit rod end and left a nice 3/8" diameter hole for the
bolt. No drilling will be required on this piece.
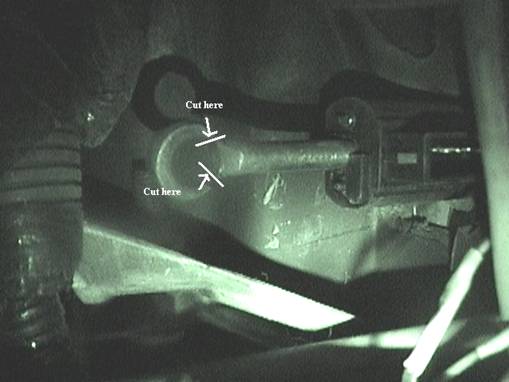
Note:
When removing the tab, make sure of its location in correspondence to the pedal
assembly to allow proper pedal travel upon reinstallation. The cuts made on the
pushrod are noted below in the photo. I used my Dremel tool with the 24"
flexible cable extension, as room was sparse. To cut the eye off the push rod I
used one of my old chainsaw sharpening grinder bits and went at it from the
inside out where the eye meets up with the shaft.
Once
I got it close then I switched to the outside of the eye and got it pretty
close when she gave in. Had to wait a few minutes in between because the metal
kept getting hot and my 3 yr old had run off with my needle nose
vise-grips. About the only thing I had
to get in there was that or my hand. This can also be accomplished by using the
cutting wheel discs that are also available for the Dremel tool and would be a
little easier, but have plenty of cutting discs handy because the push rod is
hardened and will take some time to cut thru. I found that it was better to
leave as much material as possible on the push rod for the heim joint to have
some “meat” to hold onto.
The
next step of the process is to prepare the heim joint for installation. With a
little help from some friends of mine with a drill press, we drilled the heim
joint and tapped it for a ¼”–20 set screw and installed the set screw with a
retainer nut onto the joint. After I got
things cleaned up the best I could on the push rod, I then took another bit and
ground the threads off the inside of the heim joint as things were still a
little snug and the joint was threaded but not needed for this application.
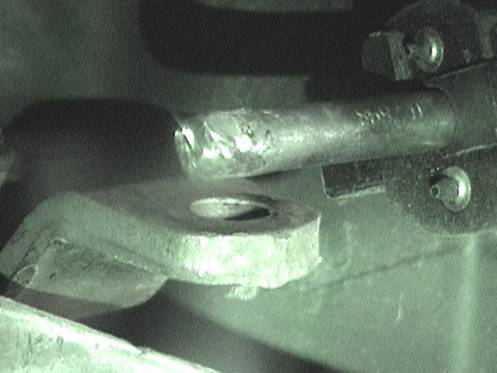
The
photo below shows the push rod all ground down and cleaned up with the clutch
pedal tab reinstalled awaiting assembly.
Installation
The
shaft length was just right for the heim joint and no further touching up
needed to be done, which gives ample room for travel. Full extension of the
clutch pedal will put the end of the heim joint right up to the face of the
clutch interlock switch. Once installed,
there will be no more slop at the top of the pedal and will provide constant
pressure all the way to the pedal stop to properly engage/disengage the clutch. To install, simply slip the heim joint over
the end of the clutch cylinder push rod, and tighten the set screw and locking
nut. Insert the 1” long bolt through the
clutch pedal lever, being sure to use
flat washers on both ends. Tighten the
nylon lock nut just enough to hold it firmly, yet allow the pieces to rotate
against each other. See the photo below.
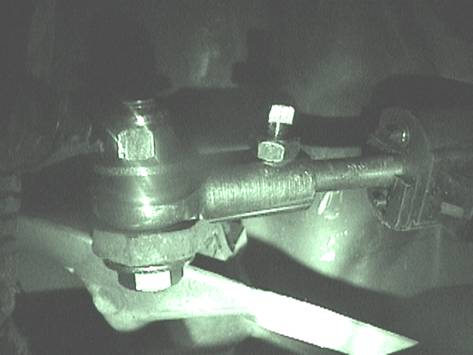
Below
is a finished look at the modification installed and now operational in my
truck.
Items needed for this
modification are:
1- 3/8" Heim joint made by Aurora Bearing Co. Aurora IL part number CW-6.
1- 3/8"x1 1/2" grade 8
bolt
1- 3/8" nylon stop nut
1- 1/4"x 1/2" set screw
1- 1/4 20 nut
4- 3/8 flat washers
Tools needed:
Drill press
Tap and die for ¼”-20
Dremel tool with cable extension
and cutting discs and grinding bit
Socket set
Small pry bar
Needle nose pliers
Punch
Bench grinder
Hammer
Good luck and keep on truckin’,
you'll love it! ![]()
Ron Butts
Editors note: Ron is an accomplished mechanic of many years, and serves in the United States Naval Reserve working on heavy trucks and equipment and is a respected member of the Brotherhood of Oil Burners.